Fulcrum, Lever, Strong Foot - Strong Mind

As I discussed in my previous blog post, the human body has a continuum from the feet to the head and out to the hands of an inter-dependent system of stability and mobility. Starting with the feet there is an alternating pattern of Stability-Mobility that progresses upward. If the feet are not stable, this can result in compensations up the human kinetic chain as the body attempts to re-balance this continuum. I discuss this in detail in my book, “Fulcrum-Lever-Sport: A Handbook of BioMechanics for Improved Performance and Injury Prevention” and want to highlight some of the points in this post.

I see numerous patients every week who complain of issues in their knees, hips, backs and even up higher that can be traced back to a lack of stability in one or both of their feet. When I ask them about specific “training” of their feet, they most often share with me previous attention that has been paid to the mobility and/or training of their ankles. The intrinsic muscles of their feet have not been specifically trained for the task(s) that the patient is demanding of them.

*** Clarification: For explanation sake, I like to classify two ~”types” of muscles in and of the feet; the intrinsic and the extrinsic muscles. The intrinsic muscles begin and end in the foot and are primarily involved in providing stability to the arch(es) of the foot. The extrinsic muscles begin (usually) in the lower leg and end (usually) in the foot and are primarily involved in providing mobility of parts of the foot and the ankle.***

Not specifically addressing the intrinsic muscles of the feet, results in not specifically addressing the issue. Gaining benefit from ancillary training of any area in the body, provides mediocre results at best. And in this case training the muscles one step higher up the system (the ankle versus the foot) may help to a degree, but will not specifically address the root cause of the problem.

As I discuss, in my book, the foot can be seen as an interesting fulcrum (the muscles and bones of the arch(es)) with a lever arm (the lower leg - tibia and fibula) coming up from the hinge point (the ankle joint). The fulcrum needs to be stable in order to provide mobility to the lower leg across the ankle joint. Again, when the foot/fulcrum is not stable, problems can arise up the chain.

The foot is actually comprised of two main arches, a main longitudinal arch and a main transverse arch. We commonly refer to the “arch of the foot” as the bottom of the foot from the heel to behind the big toe, this being the longitudinal arch. And there is another arch that travels behind the balls of the feet on the bottom of the foot from behind the big toe to behind the pinky toe, this being a transverse arch. For optimal function of the foot and in order to provide a stable platform, BOTH of these arches need to be functioning properly. In addition, both of these arches need to be trained specifically and individually before they can be used and trained as part of the larger system. Without specific training, the best we can hope for is secondary and mediocre training and thus results. Even when training barefoot, unless we are specifically addressing the intrinsic muscles of the feet and both arches, we are only secondarily training an extremely important part of the overall functional system of the body.

Barefoot training during squats, deadlifts, or other non-specific exercises is great for overall integration and activation of the feet into the whole system, yet may be integrating and activating a specific area that is lagging or in need of specific attention. We don’t want to integrate any piece into the overall system that is not optimal. It may lead to less than optimal function of the overall system by using less than optimal pieces.

Specific training of the feet (both longitudinally and tranversely) is simple and easily worked into any daily regimen with minimal equipment.

One of my favorite daily exercises, primarily for the longitudinal arch, is the Ankles Roll Foot Active exercise. For this exercise, barefoot on a firm surface, Roll your ankles in - raise all your toes up, pause, then roll your ankles out - scrunch your toes and flex your feet to grip the earth, pause, repeat back and forth slowly but surely.

Along the same lines, one of my favorite exercises for the foot that primarily stimulates the transverse arch is The Banded Big Toe Heel Raises exercise. While this also trains the longitudinal arch, it also - by means of providing traction across the base of the big toe - stimulates and activates the transverse arch which lies behind the balls of the feet. For this exercise take a light band around both big toes, with feet slightly less than hip width (enough to provide a slightly uncomfortable stretch on the big toes), and with relaxed feet rise up on your relaxed toes. Repeat this slowly but surely up and down.

In my clinical experience, these two exercises begin the process of activating and specifically training the intrinsic muscles of the feet so that they are capable of providing a stable platform under a mobile ankle, and integrate into the rest of the stability-mobility continuum up the rest of the body.

If you have any questions, please do not hesitate to contact me!

Michael Ross DC, CSCS, DACRB

Fulcrum, Lever, Neck: A Case Study

Numerous authors (McGill, Boyle, and Cook, to name a few) have demonstrated the mobility - stability continuum that exists within the human body. In a nutshell, this continuum is that starting from the ground up, with the foot, and going joint by joint through the body, there is an alternating pattern of stability and mobility that is the ideal for optimal function and minimal injury.

From this, we can see that the neck (cervical spine) is designed to be more stable than mobile on this continuum. This may be a challenging concept to embrace because we think of the great deal of movement that our necks have on a daily basis. We are quite often most aware of our neck when we do not have adequate mobility and feel stiff, tight and/or limited range of motion. We seek treatment (Chiropractic, Massage, Yoga, etc.) in an attempt to decrease this stiffness and tightness and strive to be able to move our neck more freely.

This feeling can often be misleading, however. If the neck is designed to be more stable than mobile, when it is not stable, we may experience the “reactive muscle guarding” that feels stiff and tight that occurs as a protective compensation mechanism. From there, we may continue to work on loosening up this stiffness and tightness through more treatment aimed at increasing the mobility. The problem arises in that we are then undermining the compensation which leads to further compensation, in this situation, further “reactive muscle guarding” and resultant more stiffness and tightness. This serves the exact opposite of the outcome we are expecting and wanting.

This scenario was exemplified in a patient who came in to my office. He had gradual neck stiffness and tightness that had developed slowly over a few months. He reported no injury or trauma to his neck or shoulders. Prior to coming in to my office, he had been to a reputable Chiropractor numerous times and had a handful of massage therapy sessions. After all of these appointments, he reported short term feeling of relief that went away within about 24 hours following the visits and quite a few times felt worse, including feeling more stiff and more tight than before his visits. He was given static stretches to perform regularly, which he also experienced no relief from and often felt as though it made his neck worse.

Keeping in mind the definition of insanity, “…doing the same thing over and over, while expecting a different outcome…”, I did not want to have him do more Chiropractic adjustments and massage. Referring back to the stability - mobility continuum, I approached his situation from what I believe is a novel approach.

(As a side note. An interesting finding during range of motion testing, was that when he extended his neck, we were able to increase his limited range of motion with applying significant resistance against him. His “active & resisted range of motion” was greater than his “passive range of motion”. So clearly, he had range of motion, it was just limited by some muscular based mechanism.)

The novel approach that I took was to have him specifically work on stabilizing and strengthening the muscles of the his neck (see below for one example). I also instructed him to minimize, if not remove completely, any static stretching of his neck. Initially, both immediately after his visit, as well as for a few days following, he experience more feeling of stiffness and tightness with a feeling of decreased range of motion in his neck. On the follow up visit I measured his range of motion, active, resisted, and passive, and all were the same as upon his initial examination. I advised him that this initial increased stiffness and tightness feeling may be due to a training effect of historically untrained muscles. He continued, and still continues, to train the stability and strength of his neck muscles.

An example of some of the neck stability and strengthening exercises

At a 3 week follow up, he reports feeling “more comfortable and more mobile” throughout his daily activities. He also reports that he has not done any of the stretching that he was given previous to his visit with me.

He is feeling less stiffness and less tightness in his neck.

At first glance, it may seem a bit paradoxical that by training the stability and strength of the area, that we would see improvements in mobility and range of motion. But, when you look deeper into the biomechanics, muscle physiology, and function it makes complete sense. A more stable system is a more ‘relaxed’ system under a load.

I will post a follow up at his 12 week appointment. The plan between now and then is to have him continue to progress on stability and strengthening exercises of his neck and shoulders. The expectation is not to see significant results until at least the 12 week mark, as it took him months to get to this point it would seem logical that it may take equally as long to resolve. (“If it takes a mile to hike in, it takes a mile to hike out.”)

Stay tuned,

Michael Ross DC, CSCS, DACRB

Training the Low Back

Building off the two previous blogcast posts, an area that patients and athletes frequently continue to ask me about is the low back (“Lumbopelvic Fulcrum”). The following is another excerpt from my book, “Fulcrum-Lever-Sport: A Handbook of BioMechanics for Improved Performance and Injury Prevention”.

In this, I discuss what the literature has to say about low back biomechanics and how to train the area.

The Lumbopelvic fulcrum is often referred to as the low back and encompasses the lumbar spine, the pelvis, the sacroiliac joints, the glutes, and the muscles of the low back. This area is a very common cause of pain and dysfunction, known as “low back trouble.”

In his landmark study, Biering-Sørensen (1984) found two things. First, individuals with more mobility in their low back, known as hypermobility, had an increased risk of developing low back trouble. This is especially common in men. Paradoxically, this hypermobility is commonly experienced as stiffness and tightness due to reactive muscle guarding. This makes sense, as the area is designed to be stable, rather than mobile. If it’s not stable and allows too much mobility, the system is dysfunctional and causes the individual to walk around with reactive fulcrums, rather than proactive fulcrums. A flexible lumbopelvic fulcrum is not a healthy, nor durable, fulcrum.

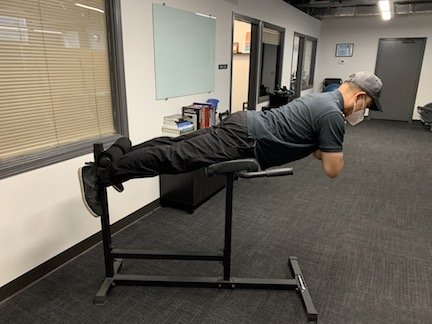
Second, individuals who are unable to maintain a back extension hold for a sustained period of time have a significantly higher risk of developing low back trouble in the following year. The back extension hold is when the subject extends off the edge of a bench or table, while their feet are held down. In this study, the subjects were slightly extended and mildly hyperextended off the edge of the bench.

Biering-Sørensen had a large group of subjects complete a long list of tests and measurements on day one. A year later, he gave the same subjects a questionnaire and asked them how often they experienced back trouble over the previous year. The individuals who could hold this position the longest had the lowest instances of low back trouble over that year period.

Back Extension Static Hold

Biering-Sørensen discovered that those who could hold this position for up to four minutes had the lowest risk of developing low back trouble.

Four minutes may seem like a long time, but remember: for even a short run, the lumbopelvic fulcrum needs to stay stable for much more than four minutes. In order to walk for a period of time, go to the gym, or work in the yard, the lumbopelvic fulcrum needs to be stable enough to keep up. That’s a long time, in comparison to the four minutes needed to maintain that lumbopelvic stability.

Since this study, other researchers have looked at dynamic training and testing of the lumbopelvic fulcrum. Some researchers had individuals perform back extensions in repetitions off of a slightly higher device. The subjects were told to flex and extend in order to test the dynamic endurance capacity of the muscles of the lumbopelvic fulcrum. These studies indicated that individuals who could complete at least 50 repetitions had a decreased risk of developing low back trouble.

Fifty repetitions may seem like a lot. However, this number is low in comparison to the 1,500–1,800 repetitions that occur with just a mile of levering activity, such as walking or running. For example, many people focus on reaching 10,000 steps a day. This means that their lumbopelvic fulcrum needs dynamic stability to lever 10,000 times. With research stating that an individual only needs to complete 50 back extensions in order to decrease the risk of low back trouble, this should be easy in comparison to these 10,000 steps a day.  

Back Extension Repetitions


Lumbopelvic Fulcrum Training Homework

In order to train your lumbopelvic fulcrum, there are two parts to focus on: static (isometric) stability and dynamic durability. First, for the isometric part, position your pelvis on a contact at least four to six inches off the ground. If you’re too close to the ground, you will have too much support, which doesn’t allow you to train the muscles properly. The ideal position is illustrated below.

Back Extension Static Hold

Place your hands across the front of your shoulders and hold yourself in a slightly hyperextended position. This may feel moderately uncomfortable, but attempt to hold the position for as long as you can. The amount of time that you’re able to hold yourself in this position is your hold test number (hT). Once you’ve established this number, complete the following routine every other day. First, aim for one set of 50% of your hold test number. Once you’ve completed this, rest for one minute. Then, repeat the hold and aim for 75% of your hold test number, and then rest for another minute. Finally, complete your last hold and aim for 125% of your hold test number, for a total of three holds.

 Lumbopelvic Fulcrum Static Hold Training Program

Test For Your Maximum Effort Back Extension Hold = hT

Then:

Every Other Day

Hold for 50% of hT

Rest 60 Seconds

Hold for 75% of hT

Rest 60 Seconds

Attempt to Hold For 125% of hT

For example, imagine a person found their test hold number to be 60 seconds. For the first set, they would aim to hold for 30 seconds (50%), and then rest for a minute. For the second set, they would hold for 45 seconds (75%), and then rest for a minute. For the last set, they would attempt to hold for 75 seconds (125%). 

If you’re unable to reach 125% during your last set, that’s okay. The goal is to reach a maximum effort hold, and eventually work yourself up to 125%. When you can reach this goal for three sessions in a row, start over and repeat the initial test to find a new hold test number. This will give you a new number to base your future sessions off of. Repeat this program, and retest every time that you achieve three sessions in a row at 125%.

In order to follow research and the progression of Stability then Mobility then Function, or Fulcrum then Lever then Sport, the goal is to maximize your hold for up to four minutes. Feel free to continue doing other activities, but work to implement this exercise into your overall workout program to help prevent, and perhaps treat lumbopelvic fulcrum imbalances and injuries. This will help increase the stability and durability of your lumbopelvic fulcrum, which will increase your overall performance. Once you reach four minutes, you can move onto the next phase: repetitions.

For the next part, we will follow the same program, but with repetitions. First, on a significantly higher platform, complete a test where you extend down towards the ground, and then come back up to engage your full range of motion. Complete as many repetitions as you can.

Back Extension Repetitions

This will serve as your repetitions test number (rT). Every other day, perform 50% of your repetitions test number, and then rest for a minute. Then, perform 75% of your repetitions test number, and rest for another minute. Finally, finish with a maximum effort in an attempt to reach 125% of your repetitions test number.

 Lumbopelvic Fulcrum Dynamic Training Program

Test For Your Maximum Effort Back Extension Repetitions = rT

Then:

Every Other Day

Perform 50% of rT

Rest 60 Seconds

Perform 75% of rT

Rest 60 Seconds

Attempt to Perform 125% of rT

For example, if a person determines that their maximum effort is 12 repetitions, their first set would consist of 6 repetitions (50%). Then, the second set would be 9 repetitions (75%), with the maximum effort reaching 15 repetitions (125%). When they can reach 15 repetitions in three consecutive sessions, they would repeat the initial test to find their new repetitions test number, with the ultimate goal being 50 repetitions. If you’re unable to reach 125% during your last set, that’s okay. The goal is to reach a maximum effort hold, and to eventually work yourself up to 125%.

Over the course of training, an ideal program would be to alternate back and forth between these two training programs over the course of a year. Spend three to six months working on stability, or the isometric hold. Next, spend another three to six months working on durability of the lumbopelvic fulcrum by completing back extension repetitions. Alternating back and forth will help ensure that your lumbopelvic fulcrum has both static stability as well as dynamic durability. This combination will serve to thoroughly train the lumbopelvic fulcrum, both isometrically and dynamically, in order to improve performance and decrease injury.

As always, if you have any questions, please email me at ross@drtri.com

-Michael Ross DC, CSCS, DACRB

Fulcrum, Lever, Who?

Part II

This is another section from my book, “Fulcrum-Lever-Sport: A Handbook of BioMechanics for Improved Performance and Injury Prevention” aimed at explaining what the heck MRoss is talking about when he starts blabbing about Fulcrums and Levers.

Humans are comprised of four main levers: our two arms and our two legs. These levers attach to the torso by four main fulcrums: two fulcrums of the low back/pelvis (lumbopelvic) area, and two fulcrums of the shoulder (scapulothoracic) area.

When we compare the biomechanical system of the human body with the mechanical system of a seesaw, it’s clear that both systems use a variety of fulcrums and levers. In the human body, the scapulothoracic and lumbopelvic segments act as the main fulcrums, while the arms and legs act as the main levers. Similar to the basic mechanics of a seesaw, the amount of torque on the fulcrums is multiplied over the length of the levers. Whether we’re pushing, pulling, squatting, lunging, walking, or running, the amount of torque on the lumbopelvic and scapulothoracic fulcrums is roughly equal to the mass/weight multiplied by the length of the levers.

One difference between the biomechanical and mechanical systems is that, in the human body, there isn’t one specific hinge point at each of the fulcrums. Instead, a group of muscles surround the hinge joint. In the biomechanical system, this can be referred to as the fulcrum muscles. 

Another difference is that in the biomechanical system, the human body doesn’t automatically respond with catastrophic failure when a fulcrum is overloaded with torque. Instead, the body uses reactive muscle guarding. Reactive muscle guarding occurs because the human body has built in mechanisms that attempt to react, lockdown, and guard, and thus compensates for the overloaded areas in an attempt to prevent injury.

This is beneficial, as it helps us retain the ability to move and function, even when our system is out of balance. Reactionary and artificial guarding serves to bring the fulcrums to a level where they can handle the overload for a short period of time. However, this is only a temporary fix. The system is attempting to artificially stabilize something that’s unstable and improve the imbalance that exists between the fulcrums and levers.

When the body responds this way, we feel the reactive muscle guarding as tightness in our lower back, pelvis, and shoulders. Most experts will report that the way to fix this problem is to stretch out these muscles, and it’s not just clinicians that say this is the solution—it’s yoga instructors, CrossFit® instructors, and everybody in between that tells you that you need to stretch. However, this feeling is not a diagnosis. When an area feels tight, we may not know why it feels this way. It could be due to overload, imbalance, injury, or a problem with the range of motion.

In the case of overload and imbalance, if we try to loosen up our muscles, we’re undermining and working against the protective mechanism that’s stabilizing our overloaded fulcrum. While we may feel temporary relief, we’re engaging in a chronic tug-of-war with our own compensation mechanisms. Stretching and loosening the muscles may manage the symptoms momentarily, but it’s merely putting a Band-Aid on the problem, rather than resolving it.

Fighting with our body’s natural processes will only keep us in a chronic state of artificial compensation. That is, until the mechanism fatigues and is no longer capable of maintaining this artificial state. This is when catastrophic failure is possible. We’ve chronically pushed this imbalance to where our body can no longer compensate, and we’re pulling the rug out from underneath our already overloaded system.

Think back to Rule #1, which states that the fulcrum needs to be strong enough to withstand more than the amount of torque that’s produced by the levers. If we decrease the fulcrum’s ability to handle torque in this artificial, guarded state, we are further increasing the imbalance between the fulcrums and levers. This increases the risk of eventual injury and/or catastrophic failure.

In this scenario, the best thing to do is to work on increasing the stability, strength, and durability of the fulcrum muscles. The goal of an optimal biomechanical system is to have as much healthy function as possible. While we could decrease the load and torque on the fulcrum, this would also decrease our function and allow us to do less. Conversely, if we are able to increase the strength, stability, and durability of the fulcrum muscles, we will then increase and improve our overall function. We can fulcrum more, fulcrum longer, and fulcrum harder.

Rule #2 states that any sort of looseness, laxity, or instability in the mechanical system fulcrum will lead to catastrophic failure. In the biomechanical system, literature shows that the hallmark sign of instability of a joint complex is localized reactive muscle guarding of the muscles around the joint. This is similar to reactive muscle guarding discussed in Rule #1, when the fulcrums become overloaded by the levers. Reactive muscle guarding occurs when there’s overloading of the fulcrums, or in this case, if there’s instability in and around a fulcrum.

Rule #3 states that if we were to build the perfect biomechanical machine, we would begin with the fulcrum to establish stability. Rules #3 and #3a start with creating functional durability and strength of the fulcrum from a stability standpoint, rather than a mobility standpoint.

The challenge with building stability and durability is that when we embark on an endurance activity, we want to start training with mobility because there’s a desire to get moving towards our goal. If a person wants to run a marathon, their first thought is that they need to start running, because that’s the function that they’ll be doing. But, if we think back to Rule #3 and #3a, this would be putting the cart before the horse. Training this way is putting the levering phase before the fulcrum phase. What we need to do is take a step back and think about stability first.

On the first day of training for an event, our fulcrums and levers are already at established levels and are hopefully in balance. If we start by training our levers, this will create an imbalanced ratio. The lever arms will become more capable and more functional than the fulcrums. If the levers are stronger than the fulcrums, this imbalance can lead to injury, dysfunction, and ineffective performance. In an ideal model, it’s pertinent to engage the fulcrums to a certain level where they’ll be ready, durable, and stable. This will establish and maintain the optimal fulcrum-to-lever ratio.

If the fulcrum is more stable and more durable than the lever, no injury occurs. Increased stability decreases the risk of injury—if it doesn’t move, it doesn’t get injured. When your lever arms are producing more torque than your fulcrums can withstand, injury occurs. This happens when you’re unstable or out of balance. The system doesn’t perform as well because the fulcrum wasn’t designed to carry the load that you’re putting onto it. At some point, it will get overloaded and it will fail. This is a common cause of injury.

As always, if you have any questions. please feel free to email me at ross@drtri.com

-MRoss

Fulcrum, Lever, What?

Part I

As most of my patients and athletes can tell you, I can weave the words, “Fulcrum, Lever, Sport” into just about any conversation. While this makes complete sense to me, there have been numerous times when ‘innocent bystanders’ have no idea what I am talking about. In this instance, the term ‘innocent bystanders’ refers to people who happen to be nearby - or even participants of the conversation - when MRoss starts ranting about Fulcrums and Levers and Sport in response to any conversation related to injury or functional fitness. They stand there trying to be polite while MRoss goes on and on, blah blah Fulcrum, blah blah Lever, blah blah Sport. In this, and the next, FLS BlogCast episode, I draw from two sections of my book, aptly titled, “Fulcrum-Lever-Sport: A Handbook of BioMechanics for Improved Performance and Injury Prevention” in order to explain these terms that I can’t seem to shut up about.

We, as human beings, act as biomechanical machines and rely on a series of fulcrums and levers. We need these fulcrums and levers in order to function—to be able to push, pull, squat, or lunge. To understand humans as biomechanical machines, it’s helpful to step back and examine a simpler mechanical machine: a children’s seesaw. A seesaw is comprised of a fulcrum, a lever, and the mass, or the child, at the end of the seesaw.

There are a few basic rules in the laws of physics that apply to this simple mechanical system:

·       Rule #1: The fulcrum needs to be strong enough and substantial enough to support the lever and whatever mass or load is put on the lever.

·       Rule #2: The fulcrum needs to be the most stable part of the overall system.

·       Rule #3: Fulcrum, then Lever, then Sport.

·       Rule #3a: Stability, then Mobility, then Function.

Rule #1

The laws of physics state that the amount of torque, or load, on the hinge point of the fulcrum is roughly equal to the length of the lever, multiplied by the mass/weight that’s exerted on the end of the lever. The longer the lever, the more torque that will be applied to the fulcrum hinge point.

For example, if you place five pounds near the fulcrum hinge point, the torque will be minimal. However, if you extend those five pounds further out on a longer lever, it will put more force on the length of the lever arm, which in turn, adds more torque. This also occurs when additional weight is added to the lever. The more weight there is, the more torque that will be applied to the fulcrum hinge point.

In order to support the torque put upon the system, the fulcrum needs to be more substantial than the lever. It needs to be designed to withstand extensive loading because it’s not a static system—it changes and moves. Over time, there will be a repeated amount of levering on the fulcrum hinge point. The fulcrum needs to be strong enough and sturdy enough to withstand this repeated movement for a long period of time.

If the torque exerted by the lever on the fulcrum hinge point is more than the fulcrum can withstand, catastrophic failure is likely to occur. For example, if two full grown adults attempt to use a children’s seesaw, the seesaw may potentially fail due to it being designed for children. If the load is too large, or the lever is too long, the fulcrum will collapse under the weight of the load because it’s not designed to support the weight that’s being put upon the system. Too large of a load on the lever can, and will, overload and destroy the fulcrum.                                                                  


Rule #2

The fulcrum needs to be stable, solid, and durable. Any instability, looseness, or laxity within the fulcrum hinge point can lead to catastrophic failure. While this won’t happen immediately, after time, with repeated levering, the fulcrum will eventually wear down and fail. To maintain efficiency, the fulcrum needs to be built out of rebar, steel, concrete, and solid material, with a solid, smooth, well-oiled hinge point. Any instability within this system will lead to substantial errors and ultimately, failure.

Rule #3

If a seesaw were to be built in the backyard, the fulcrum would be built first as the foundation. A solid, flat piece of ground would be sought out, and the necessary materials to build the seesaw would be purchased. When all the items were gathered, the specifications would be studied and the building timeline would be created. The fulcrum would then be built under these conditions with these materials, and nothing less.

These necessary steps would need to be taken in order to create a sturdy, successful fulcrum. Rule #3 is that the fulcrum must be built prior to the lever in order to maintain optimal functionality.


These steps need to be completed in order. For example, a lever wouldn’t be put on the ground with the assumption that the fulcrum would be created from underneath, because it would collapse under the weight of the lever before it could be created. The fulcrum needs to be constructed first and checked for durability. Once this has occurred, the lever is placed upon the fulcrum and checked for any unwanted looseness or instability. Then, and only then, would the seesaw be considered safe and ready for use. This is a very important aspect of the process. The seesaw would not be used for levering until the fulcrum is built and ready. It may take some time to build the fulcrum to where it is ready to lever, but using the seesaw before the fulcrum is ready would be a recipe for disaster.

For example, two children would be able to effectively seesaw with a system that is built following the proper steps. If the steps aren’t followed, or are completed out of order, the seesaw wouldn’t function. This would be the equivalent of placing children atop the lever before the fulcrum was constructed. It just wouldn’t work.

Creating a fulcrum and lever system follows a specific order of building basic machinery. This order needs to be followed to guarantee the utmost function and safety.

Rule #3a

Building the fulcrum first is done to guarantee stability. The static portion of the system (fulcrum) is created prior to the moving portions (lever). The fulcrum is built out of the necessary materials, the lever is checked for stability, and the hinge joint is checked for proper functionality. Following these steps will ensure it will function the way it’s designed to.

Similar to Fulcrum then Lever then Seesaw, this process can be known as Stability then Mobility then Function. When the pieces are properly assembled, completed in order, and are in ideal working condition, they will function as a seesaw.

In Part II, I will share how this relates specifically to human beings.

-MRoss